Product Management
Product Management
You will learn best-practice for building products that customers love, with a focus on digital products. You will walk through the product lifecycle, including: ideation, prototyping, testing, building, finding product-market fit, communicating the launch and pivoting. You will also explore examples of how Amazon, Google, Apple, Basecamp and Fog Creek made their product teams.
In this training, you will
- Learn best-practice for building products that customers love, with a focus on digital products.
- Walk through the product lifecycle, including: ideation, prototyping, testing, building, finding product-market fit, communicating the launch and pivoting.
- Explore examples of how Amazon, Google, Apple, Basecamp and Fog Creek made their product teams.
Skills that will be explored
Product Discovery
Introduction
This course will teach you how to execute a product discovery process that will increase your product’s odds of success. Before you start, please note the following:
- This course was designed primarily with technology products in mind, but the information here can also be applied to other types of products.
- This course presents a sequence of steps that a product manager would typically follow. However, every product and team is different so we encourage you to adapt this process as needed. Feel free to choose your own sequence or even skip certain steps if you feel they don’t apply to you.
What is Product Discovery?
Product discovery is a process that increases the odds of product success. It attempts to answer the question: what should we build and for whom? Product discovery starts with the basic assumption that no matter how well you think you know your customer, you still face a number of risks when starting out. In product discovery, we define these risks as follows:
- Value risk – Will customers choose to pay for your product (or become regular users if the product is free)?
- Usability risk – Is your product designed in such a way that customers will be able to use it efficiently and enjoyably?
- Feasibility risk – Will your team be able to build and maintain the product given your available time and resources?
- Business viability risk – Does your product support the company’s business goals?
With product discovery you can reduce these risks before you spend money developing or launching your product. Ignoring or shortcutting the discovery process can result in excessively high risks in or more of these areas. This, in turn, increases the likelihood that your product will fail or possibly never even launch.
Problem vs. Solution Space
At the beginning of product discovery, you will be alternating frequently between two modes of thought: what is the problem I am trying to solve and what is the solution to that problem? We call these the problem and solution spaces. As you gain clarity around the problem, you will spend more time in the solution space. That said, it is crucial to make sure you correctly identify the problem or your solution will be worthless.
Hypotheses Validation
One way to think of product discovery is like a laboratory in which you will be running a series of experiments. As with scientific experiments, you will use product discovery experiments to test hypotheses about the problem and solution you are working on. In designing these experiments, you must make sure that you are able to capture the necessary data to determine if your hypothesis is true or false. We call this process hypothesis validation. In general, as you move through product discovery, you will want to test your riskiest hypotheses at each stage. This way, you minimize the odds of a high risk issue coming back to bite you later in the process.
Discovery Techniques
Over the years a number of effective discovery techniques have been invented and more are still being created. In this course we review some of the most popular and effective techniques. Choosing the right technique depends on the type of product you are building, your market, available resources, and other factors. But no matter which technique you use, product discovery is all about “getting out of the building” and testing your ideas with real customers.
Points to Consider
- Discovery is a journey – As the term “discovery” implies, the product we are seeking already exists and our job is to conceptualize and define it. But discovery is rarely a straight path. Be prepared for detours, meandering and even going in circles. This can feel unsettling, but rest assured, if you follow these steps, you will always be getting closer to the final destination.
- Discovery is a continuous process – Launching your product doesn’t mean the end of the discovery process. In fact, this is really just a new beginning. As you receive customer feedback you will uncover even more problems and opportunities that your product can address. Likewise, you will discover adjacent problems that your product can expand into; for example: Amazon started selling books, then CDs, then DVDs and ultimately nearly everything. Discovery will remain an essential tool for defining these new solutions.
- Discovery is multi-disciplinary – Great products result from tight collaboration between engineering, design, marketing and product management. Make sure these team members are an integral part of your discovery process.
Helpful resources
- Steve Blank, The Startup Owner’s Manual
- Silicon Valley Product Group, The Four Big Risks
- Steve Blank, Why Build, Measure, Learn – isn’t just throwing things against the wall to see if they work
- Product Talk, Hypothesis Testing
- Hillary Hayes, Hypothesis Driven Validation
STEP ONE: Customer Discovery Interviews

Source: Launch Lab
The best way to begin your product discovery journey is to talk to prospective customers. In product discovery we use a very specific technique called customer discovery interviews to get the most out of these encounters. What makes this approach unique is that it avoids directly asking the customer what they think of our solution. Instead we ask open ended questions to uncover opportunities and understand behaviors, beliefs, and motivations. To learn more about asking open ended questions please use the following resources:
- HotJar: https://www.hotjar.com/blog/open-ended-questions/
- Hubspot: https://blog.hubspot.com/sales/the-art-of-asking-open-ended-questions
Even if you already think you know your customer, these types of interviews can be eye opening. You may even discover you are targeting the wrong customer. Interviews also bring your customers to life in a way that research reports can never match.
How to Interview
Even though customer discovery interviews follow an open ended approach, this doesn’t mean they aren’t structured. You will create a script beforehand to make sure you don’t forget any important questions. For a B2B product, these might include:
- Tell me about your role at the company?
- What’s a typical day like?
- What is the hardest problem you currently face?
- What solutions have you tried to solve that problem?
- What do you like and dislike about those solutions?
We have included links below to sample questions and instructions on how to create your own questions.
Whom to Interview
As discussed, an underlying philosophy of customer discovery interviews is to avoid making assumptions about your target customer. Therefore, you should start by forming a hypothesis about the profile of your target customer. Then, conduct a few interviews with that customer profile to test your hypothesis. If it turns out you were wrong, form a new hypothesis and start the process over. Eventually, you will discover the correct profile or realize that you have reached a dead end, at which point, it may be time to start working on a new idea. Another challenge you may face is recruiting interview subjects. This can be time consuming and requires creative thinking. Here are some of the most common recruiting approaches:
- Networking – Ask friends and colleagues for introductions. Use Linkedin and other social media sites to recruit candidates.
- Introductions from interviewee – Each person you interview provides an opportunity for further introductions. For example, if you are interviewing B2B subjects, your script should include questions like “Is there anyone else in your department you think I should speak to about this problem.”
- Meetups – Attend a meet-up focused on your target industry or start one yourself.
Points to Consider
- Practice makes perfect – The customer discovery interview approach is unnatural for most people. We are used to asking for feedback, not asking open ended questions, and listening carefully for nuggets of insight. Therefore, your first few interviews may not be very productive. Instead of wasting the opportunity, do some practice interviews with friends or colleagues first. You can also hire an experienced researcher to conduct the interviews for you.
- The goal is learning, not selling – Whatever you do, resist the temptation to ask for specific feedback about your idea. This is likely to bias your data because most interviewees will try to please you. If you feel the need to ask for direct feedback, wait until the end of the interview until after you have received sufficient unbiased information from the interviewee.
- Invite your team – As discussed, discovery is a collaborative process. If at all possible bring along your designer and engineer. This will enable them to more effectively extract insights from the interviewee’s responses by observing body language and facial expressions. It will also give everyone on the team a shared reference point during later discussions about product features. That said, make sure your interviewee is comfortable with multiple observers. You also minimize discomfort by conducting the interview so that you are the only one speaking with your teammates remaining silent observers.
Helpful Resources
- Customer Development Labs, How to interview customers
- Venturewell, Customer Interviews
- Wrkshp, 100 Customer Interview Questions
Deliverables
- Create an interview script
- Form a hypothesis about whom to target and create a recruiting list
- Practice on several friends or colleagues
- When you are ready, conduct several actual interviews
- Discuss the results with your team
- If you need to target a different customer profile, start the process again
STEP TWO: Customer Journey Map

Source: Launch Lab
A customer journey map is a diagram that shows how customers interact with a product as they move through different stages of use. Creating a journey map has several benefits:
- Uncovers problems and opportunities – Journey maps are a great way to identify pain points that your product can potentially address. Conversely, they help you identify parts of the journey where customers are satisfied with their existing solution and may not be interested in yours.
- Empathy – Journey maps help bring your customer’s experience to life and create shared empathy among your team.
- Inspires system-level thinking – The process of creating a journey map forces you to break down how the customer experiences your sales process, marketing and product into discrete touchpoints that work in unison to influence customer behavior.
Journey Map Design
The type of data displayed on journey maps vary widely but the basic format is the same: a horizontal diagram divided into columns representing stages or touchpoints. Each touchpoint represents an interaction with a company or its product. The diagram’s rows are used to communicate various aspects of the customer’s experience at each stage. The possibilities here are nearly endless, but you will probably want your map to answer the following questions at each stage:
- What goal is the customer trying to achieve?
- Are they satisfied or dissatisfied?
- What problems are they encountering?
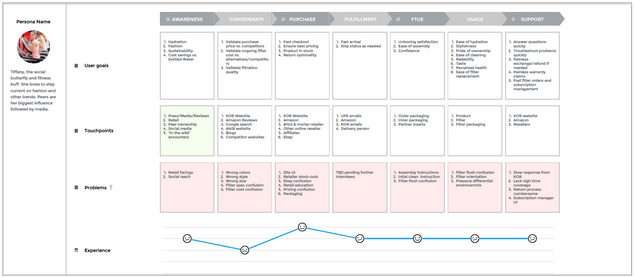
Source: Launch Lab
Creating your Map
Prior to launching your product you will be using the journey map to diagram your customer’s interactions with existing solutions. After you launch, you can use journey maps to analyze customer interactions with your own product. Here’s how to create your first journey map:
- Choose a customer profile – What type of customer will your map focus on? For maximum accuracy, you should base your map on the experiences of your interview subjects. You can even combine multiple subjects into a single profile. You can also bring these profiles to life with a technique called personas. If you haven’t yet created personas, we provide more information about them here.
- Define a scenario – What overall goal is the customer is trying to achieve? For example, if they are buying a car, the map should be confined to activities related to that scenario.
- Define your touchpoints – What stages does the customer go through as they complete the scenario?
- Decide what to analyze – For each stage in the journey, you will be analyzing some aspect of the customer’s experience. Create horizontal rows for each type of experience you wish to analyze.
- Map the customer journey – Fill out the horizontal rows on your map with the data you are analyzing at each stage. If you have insufficient knowledge to complete this step, you can conduct additional interviews or surveys.
Points to Consider
- Validate your assumptions - When you first create your map it's acceptable to leave gaps or make assumptions when you don’t have enough data. The process of creating the map is valuable in and of itself because it forces you to put yourself in the customer's shoes. However, it is risky to continue the product discovery process for too long without closing these gaps because over time you and your team are likely to accept these assumptions as facts. Therefore it's important to have a plan in place to validate your map by asking actual customers about their journey.
- Start with the pre-purchase experience – Even though you are focused on product discovery, it's important to map the parts of the journey that take place before the customer encounters your product, such as your sales and marketing efforts. These can provide valuable insights about how to design a better product. By the same token, don’t forget about the post-purchase experience. How do customers get support if they have problems, or refunds if so desired?
Helpful Resources
- UX Planet, Beginners Guide to User Journey Mapping
- Visual Paradigm, What is Customer Journey Mapping?
- Harvard Business Review, Using Customer Journey Maps
Deliverables
- Build your journey map
- Share with your team for feedback
- Validate key assumptions as needed
STEP THREE: Surveys

Source: Launch Lab
While interviews allow you to go deep with a particular customer, they are time consuming. By contrast, surveys allow you to quickly gather data from large numbers of potential customers. Unlike interviews, the data will not be as rich. Surveys can, however, be excellent tools for enriching the customer profiles from your interviews and even testing demand.
Survey Goals
The first step is to decide on your goals for the survey. You have two basic choices:
- Gathering additional data about your target customer – You can use surveys to answer questions that weren’t adequately answered during your interviews or that you didn’t have time to ask. Since surveys can be anonymous, you can also ask questions that would have been awkward to ask during an interview, such as the customer's income. Surveys can also provide statistical validation for the answers you received during interviews, This is especially useful if you received conflicting answers from multiple interview subjects.
- Testing demand – Unlike discovery interviews, surveys can be a useful tool for determining whether customers are actually interested in your product. You can do this by describing the product in words or images and asking a series of questions to gauge interest (e.g. “How much would you pay for this product,” or “Would you recommend this product to a friend?”). However, you should not rely solely on such data to validate your hypotheses. This is because such a survey is only a weak simulation of real life. No matter how vivid your description, it's unlikely to match the customers real-world experience once they are faced with a buying decision.
Types of Questions
Next, you will need to decide on the types of questions to ask. The first decision you will have to make is whether your questions will be quantitative or qualitative. Quantitative questions restrict the respondent to a finite set of choices, while qualitative questions enable write-in responses. You can combine both approaches, but for a large scale survey you will want to emphasize the quantitative. This is because it is time consuming and often impossible to summarize qualitative data in a way that is statistically useful. However, if you are surveying a small number of customers, a qualitative survey can be very effective.
Recruiting
Recruiting survey respondents can be a challenge, especially for large scale surveys. If you are planning a quantitative survey, you will want the results to be statistically valid. This may mean hundreds of responses. You will also need to assume that not everyone you invite to the survey will actually complete it, and some of those who do complete the survey may not actually be your target customer. So how do you recruit enough people to ensure a sufficient number of valid responses? That depends on your budget. The best free option is likely to be social media. Paid options include running ads search or social media sites, purchasing a mailing list or using a research panel such as Survey Monkey Audience.
Points to Consider
- Make sure you are surveying the right customer – No matter how well-targeted your recruiting effort, some of the people who take your survey will fall outside of your target profile. Therefore you should start your survey with a series of qualifying questions to make sure the person is a potential customer.
- Keep it short – The longer your survey, the lower your completion rate will be. Therefore it's important to trim your list of questions to the absolute essentials.
- Ask for permission to follow up – Your survey doesn’t have to be the end of the conversation with a respondent. You can use the survey to capture their email and ask if they would be willing to answer follow up questions
Helpful Resources
- Slide UX, Do-It-Yourself Recruiting for User Research
- Startup Grind, How to Conduct a Market Research Survey for Your Product Idea
- Survey Monkey, Market Research Surveys
Deliverables
- Decide on the goals for your survey
- Define your target audience and desired sample size
- Design and launch your survey
- Analyze the results
STEP FOUR: Prototyping

Source: Launch Lab
By now you should have a clear idea of the customer problem you want to solve. At this stage, prototyping is an excellent next step because it will accelerate your ability to find the right solution. A prototype is a crude version of your product (or part of your product) that can be used to obtain feedback from either your target customer or an internal stakeholder. Prototypes can be created and tested very quickly and cheaply, so the typical prototyping process is iterative. You will create prototypes, obtain feedback, refine them and repeat the cycle until you have confidence in the solution.
Kinds of Prototypes
Prototypes take many different forms, each of which can be used to test different types of risk. However, they are best for assessing either value risk and usability risk. It is possible to assess feasibility risk with a prototype but this is less common and requires writing code. Another key distinction is a prototype's level of fidelity. This is the degree of polish or realism that the prototype exhibits. Prototypes can either be low or high fidelity. These differ as follows:
- Low fidelity – These prototypes are primitive and easier to create. They are used earlier in the design process to rapidly test and iterate ideas until the team has enough confidence to consider building a high fidelity prototype. Low fidelity prototypes are better suited for internal feedback and ideation since they may be hard for customers to understand without extensive explanation. Examples include sketches, paper prototypes, wireframes and mockups.
- High fidelity – These take longer to create but enable more accurate feedback and are better suited for testing with actual customers. High fidelity prototypes are typically created later in the process, and due to their detailed nature, they can be very effective at assessing usability risk. Examples include interactive prototypes, video prototypes and live data prototypes.
Prototype Testing
You can test your prototypes either internally with your team or externally with customers. Internal testing is faster but the results are less reliable. Therefore internal testing is ideal in the early stages of the design process when you are seeking an overall direction. It is also an excellent way to obtain quick feedback on a design before testing it externally. As your design evolves and you gain more confidence in it, you should test externally.
There are no hard and fast rules about how to test prototypes. For internal testing, the process can be as informal as walking into a teammate’s office and showing them a sketch and asking for their thoughts. With external customers, you will want to provide more structure. In either case, you should observe the following best practices:
- Set goals – Know in advance what you are trying to learn from the test. For example, if you are assessing value risk, structure your questions around this topic by asking questions like “Whom do you think would be interested in this product?” or “How often do you think you would use this product?.” If your goals include testing specific hypotheses, make a list of these and tailor your questions accordingly.
- Remain neutral – As with customer discovery interviews, your goal is to learn, not to sell. Avoid biasing your subject by keeping your feelings to yourself whether the feedback is positive or negative. If the subject is confused about the design, it's acceptable to provide an explanation, but by no means should you defend it.
- Collaborate with your subject – Make it clear to your subject that you are there to learn and are seeking their help to solve any problems they identify. Invite contributions that build on your prototype. If you receive negative feedback ask for their suggestions about how to improve the product.
Points to Consider
- Focus on high risk areas first – Throughout the product discovery process you should test your riskiest hypothesis at each stage. This is especially important for prototypes because they can take considerable time to create. This way you minimize the chances of high risk issues going unnoticed and cropping up later in the design process.
- Consider testing multiple versions simultaneously – If you have the time and resources, testing multiple versions of the same prototype can produce more actionable and accurate results. This is because it frees your subjects from feeling like they have to say something positive about the first version they are presented. It also gives them the opportunity to contrast the two prototypes and provide more detailed feedback.
- Include your team – Even more so than other stages of product discovery, prototyping should be collaborative. Make sure to include your design and engineering colleagues during prototype creation. Try to include them during testing, or at least debrief with them after every round of testing.
Helpful Resources
- Interaction Design Foundation, Test Your Prototypes: How to Gather Feedback and Maximise Learning
- UX Matters, Prototyping User Experience
- Silicon Valley Product Group, Flavors of Prototypes
- Ideo.org, Build and Run Prototypes
Deliverables
- Create a low fidelity prototype
- Test it with either a target customer or someone on your team
- Use their feedback to improve your prototype
- Test again with the same or different person.
Minimum Viable Product

Source: Launch Lab
By now, your answers to the questions “what should we build and for whom?” should be coming into focus. But remember, until you launch an actual product with real customers, these are just assumptions and you are likely still facing significant risks. The good news is that you can measurably reduce these risks with a minimum viable product or MVP.
What is an MVP?
An MVP is simply a prototype with a distinct difference: as the name implies, it is “viable.” We define viability as follows:
- The MVP can be experienced by your target customer without the kind of hand-holding or explanation that is required for a prototype.
- The MVP is designed in such a way that it is capable of reliably testing at least one hypothesis.
And of course, MVPs are minimal. How minimal? As minimal as you can make them and still test at least one hypothesis. In fact, some of the best MVPs don’t involve writing a single line of code. How can this be? Let’s take an example. Suppose you want to test the following hypothesis: “Twitter users would be interested in a product that enables them to queue up tweets for later posting.” This is exactly the hypothesis that Buffer.com started with when they designed their MVP, which consisted of two static web pages. The first page described the product and displayed a link to pricing information. When users clicked on the pricing link, a second page explained that the product wasn’t ready yet and displayed a field for the user to add their email to a waiting list. These two simple pages were enough to validate Buffer’s hypothesis and convince them to build a second MVP to test pricing. Ultimately the company went on to launch a very successful product. This type of MVP is known as a landing page MVP. Here are some other popular types:
- Wizard of Oz – This approach combines minimal amounts of software on the front end with humans on the backend to fulfil customer requests. Customers interact with the software without realizing that most of the functionality is being performed by people. A famous example is the Zappos MVP.
- Concierge MVP – This approach is identical to a Wizard of Oz MVP, except it uses little or no software and the customer is fully aware they are interacting with a human.
- Piecemeal MVP – In this approach, existing software products are used to simulate the experience of the final product. For example, if you are planning to build a group dieting app, you might create a Facebook group to test hypotheses about peer to peer interactions. With piecemeal MVPs, you can also combine multiple software products to create an even more realistic simulation.
Hypotheses Definition
An MVP is an experiment. Its purpose is to test hypotheses about the problem you are targeting, your proposed solution or both. To define your hypotheses, follow these steps:
- Determine which risks areas to focus on – Decide which of the four risk areas your MVP will assess. While you can assess any type of risk with an MVP, they are best for assessing value risk and business viability risk. Unless your MVP has a high degree of fidelity or is designed to solve complex technical problems, you should not use it for assessing usability or feasibility risk.
- Define your hypotheses – Define at least one hypothesis to test. You can test as many you like but we recommend a limit of five to keep things manageable. Each hypothesis should target at least one of the risk areas you chose. As discussed, you should test your riskiest hypotheses first to avoid major risks from cropping up later on.
- Define your validation criteria – This is how you will determine whether a hypothesis was valid or not. For example, with the Buffer MVP, the percent of visitors who sign up for the wait list could be one of our validation criteria.
- Define your target values – This is the threshold for each validation criteria that you feel will validate your hypothesis. In the Buffer example, we might decide that a 25% conversion rate is necessary to validate the hypothesis.
Here are examples of hypotheses from an actual MVP that was designed to test an employee training solution:
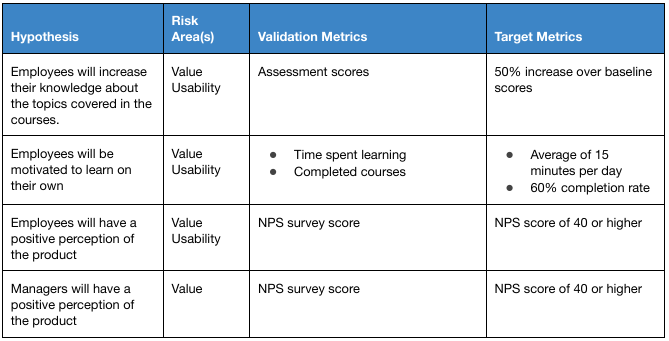
Source: Launch Lab
MVP Testing
Once you have designed your MVP and defined your hypotheses, the next step is inviting customers to use it. Unless you need a large, statistically valid sample, a few dozen customers is probably sufficient. Here are some suggestions on recruiting:
- Invite your interview subjects – If you performed customer discovery interviews, you probably already have a list of potential customers who fit your target profile.
- Use social media – Tell friends, family and colleague know about your MVP on social media.
- Facebook ads – Facebook is an excellent way to affordably target specific market segments. In addition to recruiting, you can also experiment with potential marketing tactics by varying ad copy and design. By tracking ad spend and conversions, you may even be able to forecast your customer acquisition cost.
- Search marketing – If you envision users someday finding your product through search, recruiting MVP users through search ads can be very effective and affordable.
Lastly, before launching, test your MVP with teammates, friends and family to make sure the user experience is as expected and you are able to capture the necessary data to validate your hypotheses. Even then, you may want to invite customers slowly to make sure everything is working and you have time to pay adequate attention to the incoming data.
Points to Consider
- Multiple MVPs are common – Your first MVP may not give you the confidence to start building your product. In that case, feel free to keep experimenting. You can iterate on an existing MVP by making design changes or changing the recruiting criteria. Or you can launch an entirely new MVP.
- Maintain a minimal mindset – The goal of any MVP is to maximize learning at the lowest possible cost. As you design your MVP, always ask “Is there a way to make this even simpler?”
- Don’t get hung up on definitions – You will find lots of debate about the definition of an MVP and the different types of MVPs. Don’t let this stop you from forming hypotheses and finding creative ways to validate them.
Helpful Resources
- Eric Reis, Minimum Viable Product: a Guide
- Silicon Valley Product Group, Viable Product vs. Minimal Product
- Steve Blank, Perfection by Subtraction
- Open Classrooms, The Four Types of MVP
Product Strategy
Introduction
In this course we will show you how to define a product strategy that will help you reach your product goals as quickly and efficiently as possible. Before you start, please note the following:
- This course was designed primarily with technology products in mind, but the information here can also be applied to other types of products.
- This course presents a sequence of steps that a product manager would typically follow. However, every product and team is different so we encourage you to adapt this process as needed. Feel free to choose your own sequence or even skip certain steps if you feel they don’t apply to you.
What is Product Strategy?
A strategy is a set of principles that a company uses to guide decision making in pursuit of a major goal. Companies can have corporate strategies, sales strategies, marketing strategies and, of course, product strategies. The main purpose of a product strategy is to enable a team to reach its product goals as quickly and efficiently as possible. We call this set of goals the product vision.
One way to think about product strategy is using the metaphor of a road trip. Your ultimate destination is your product vision, but what route do you take to get there? The map reveals dozens of options, but you have to pick just one. How do you choose? Weather might be one factor. The car you drive might be another. Similarly, your product strategy will depend on a variety of factors that we will review in this course. These include your business goals, target customer, competition and more.
Another way to think about product strategy is that it connects your product vision to the features you will need to build in order to achieve it.

Source: Launch Lab
As you can see from this diagram, product strategy is a necessary precursor to defining the functionality of your product.
Lastly, as this quote illustrates, strategy is all about focus:
Good strategy requires leaders who are willing and able to say no to a wide variety of actions and interests. Strategy is at least as much about what an organization does not do as it is about what it does.
- Richard Rumelt, UCLA Anderson School of Management
Designing your product to please every customer or every person in your organization will inevitably result in a watered down approach that leads nowhere. Defining a focused strategy and sticking to it in the face of challenges requires discipline. This means strategy is as much about leadership as it is analytical thinking.
Points to consider
- Don’t confuse strategy with tactical deliverables like product plans, roadmaps and feature lists. These will inevitably change as you develop your product, whereas your strategy should remain constant.
- It's acceptable to revise your strategy in the face of new data, or even to scrap it all together if the data reveals that it's destined to fail. However, such changes should not be taken lightly. Frequent strategic shifts will cause fatigue and confusion on your team. Moreover, validating your strategy may take longer than you think, and premature changes may result in the abandonment of a perfectly sound strategy that wasn’t given enough time to play out. If you have already launched your product and are concerned that your strategy is flawed, the first thing you should do is “get out of the building” and talk to some target customers using the interview technique we discussed earlier.
- Strategy requires making tough choices. This can be hard and even scary at times. If you find it easy to develop and implement your strategy, it probably means you're trying to please too many customer segments or internal stakeholders. Without a clearly defined strategy, you risk saying “yes” to every feature request, ultimately pleasing no one.
Helpful Resources
- Good Strategy/Bad Strategy: The difference and why it matters, Richard Rumelt
- Product Strategy Overview, Marty Cagan
STEP ONE: Define Your Product’s Goals
The first step in defining your product strategy is to set measurable, time-bound goals. These can range from competitive in nature (e.g. “become the number one selling app in our market within 24 months”) to the financial (e.g. “achieve 30% gross margins by Q3).
Above all, your product goals should:
- Map to your company’s overall goals and mission
- Align with your target customers’ needs
- Be understood and agreed upon by your internal stakeholders
Points to Consider
- Don’t overdo it – Having too many goals makes them harder for your team to track, communicate and internalize.
- Be open to change – Goals often change when a product reaches the market and you obtain feedback from customers that you did not expect.
- Data availability isn't always a given – Before proposing any goal, make sure you’ll be able to capture the necessary data to measure your progress. You can learn more about this topic in our Measurement module.
- Consider how the various functional areas in your organization benefit from your product. Are their metrics represented in your product goals?
- The success of any business relies on customer acquisition and retention, so always cross-check your business goals against these needs.
Helpful Resources
- Atlassian Worklife Blog, Write achievable goals with the SMART goals framework
- Teresa Torres, How to Set Goals That Drive Product Success
Deliverables
- Create a spreadsheet or slide presentation specifying your product goals.
- Share it with your team for feedback.
Step Two: Define Your Target Customer(s)
A strong product strategy requires a very clear and specific definition of your target customer. Everyone on your team should be able to clearly envision who they are designing the product for. This common understanding is also crucial for functions such as sales and marketing. The most frequently used approach is called market segmentation. This enables you to define your customer along three primary axes:
- Demographic – This approach focuses on attributes like age, location, gender and religion. An example of a demographic segmentation would be “28-34 year old suburban women.”
- Psychographic – Use this approach to identify customers based on their motivations, lifestyle or psychological profile. For example you may want to target people who are motivated by business success, or moms who are concerned about the health of their families.
- Behavioral – With this approach you can identify customers who engage in specific activities or purchase certain products. For example, “people who use Microsoft Word” or “owners of luxury vehicles.”
Unless you are an expert on the customer you are targeting, the best way to identify your target customer is to use the interview and survey techniques we discussed earlier.
Points to Consider
- Combine multiple segments for more specific targeting – Don’t hesitate to combine multiple segmentation approaches to increase the specificity of your targets. For example, Tesla might describe its target customer as a “32-42 year old man who owns a luxury car and likes to be seen as a technology expert.”
- Bring your targets to life – Create personas for each of your targets. This approach enables you to depict your customer with photos, a backstory and detail about their preferences, jobs, family and other relatable attributes.
- Don’t boil the ocean – It's tempting to target the broadest possible market, but try to limit yourself to four targets at most. Focusing on a single target can also be a good strategy. Successful products are often designed for a passionate niche and spread quickly from there.
- Be open to change – Targets often change as a product gains adoption among different segments. You may be surprised by the types of customers who adopt your product and the ways they use it.
- Be ready to prioritize – Sometimes delays or other unforeseen challenges will force product teams to narrow their focus. If necessary, would you be able to prioritize your targets based on revenue potential or other attributes?
- Don’t forget customer acquisition cost – Make sure it is economically feasible to acquire each target as a customer. If you have doubts, consider other targets that are easier to acquire. Sometimes this can be as simple as narrowing your segmentation to identify a sub-segment that has a greater need for your product.
- Consider targeting influencers – Consider targets that can help market your product through influence and word of mouth, or by acting as reference customers. These early adopters often prove more lucrative in the long run than those that are more lucrative from a short term revenue standpoint.
Helpful Resources
- Bain & Company, Customer Segmentation
- UX Planet, How to Create Personas, a Step-By-Step Guide
Deliverables
- A list of targets to share with your team.
- Bring your targets to life with personas if possible.
STEP THREE: Identify Your Customers’ Needs
Your product has no value unless it solves a problem for the customer. To succeed in the market, your product must also solve these problems better than what they are using now (by one estimate a successful product must be 10x better than the status quo in order to break through). Therefore, you need to identify which “pain points” your product can address. If you know the customer well, these may be obvious. If not, you will need to uncover them through research, analysis and experimentation, a process known as “discovery,” which is discussed in further detail here <<link to Discovery course>>.
Points to Consider
- Get out of the building - If you don't already know your customer, learn more about them through the product discovery techniques such as surveys, interviews and prototyping.
- Visualize their journey – Create a customer journey map to identify current pain points. You can also perform a day in the life analysis to visualize how your customer moves through their day.
- Think big – Look for opportunities to create a 10x better experience for your customer compared to the products or methods they currently use.
- Practice empathy – Adopt a mindset that puts you in the customer’s shoes when making decisions about how to design your product. This may be challenging at first, but after a while it will become second nature.
Helpful Resources
- Harvard Business Review, Know Your Customers “Jobs to Be Done”
- HowDo, Product Discovery Course
Deliverables
- A list of problems faced by your target customers that your product can solve.
STEP FOUR: Analyze The Competitive Landscape
Your product strategy must also take into account the environment in which your product will compete. We call this the competitive landscape. Broadly speaking, it has three components:
- Products that directly compete with yours
- Substitutes that fill some or all of your customer's needs
- Factors that affect the competitive dynamics of your industry, such as government regulation, the cost of labor, and the overall economy.
Analyzing competitors and substitutes will help you decide which problems and features to focus on. It will also help you anticipate their strategy and maintain your lead. To use a sports metaphor this is like preparing for a game by studying the players. Analyzing competitive dynamics will help you understand the underlying forces that give rise to competition. This is akin to studying the weather and field conditions before a game.
Start by creating a grid or matrix with your product in the left hand column. List your product’s key features or the pain points it solves for your target customer. Then add columns for each competitor and substitute.
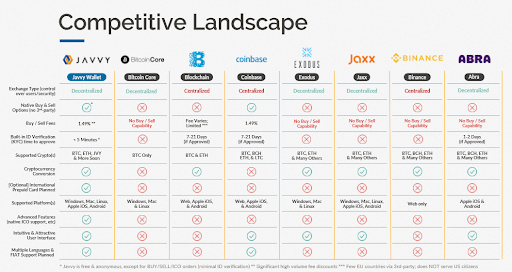
Source: Launch Lab
Now, study the resulting grid. Where does your product outperform? Where does it lag behind? Highlight these areas and consider where you might need to add features and where you can cut back to save time and money.
Next, take some time to study the competitive forces that may be influencing the behavior of each player. There are a variety of frameworks to help you do this. The most popular are SWOT analysis, Five-Forces analysis and PESTL analysis. Click the links below to learn more about these.
Points to Consider
- Get out of the building – Use customer discovery interviews and surveys to learn what products your target customers are using, and what they like and dislike about them.
- Use vertical industry databases to find competitors – Unless you have extensive experience in the market you are entering, creating an exhaustive list of competitors can be challenging. A series of Google searches should uncover most, but you can build a more exhaustive list by searching software-specific databases like Crunchbase, Capterra, G2 and Angel List. Its also commonplace to miss some potential competitors. Your list will grow more complete over time.
- Make a habit of competitive analysis – For highly competitive or fast-changing industries, competitive analysis can be time consuming. To stay abreast of the market, dedicate an hour or two each month to updating your list, but don’t feel compelled to track the every move of each competitor. It's far more important to focus on your product and your customers than the competition.
- Share your analysis – Your competitive landscape analysis is also a valuable tool for your sales and marketing teams. Make sure to get their input and keep them updated regarding any major changes.
Helpful Resources
Deliverables
- A matrix containing of your primary competitors and substitutes
- An analysis of where your product outperforms and underperforms
- An analysis of competitive dynamics using one of the frameworks listed above
STEP FIVE: Define Your Competitive Advantage
To achieve your product vision and create long-term success, you will need to build one or more competitive advantages into your product. Sometimes these are referred to as a “moat” or “barriers to entry.” Being first to market or having the best product is rarely sufficient to win over the long term. Betamax and MySpace are just two examples of such products.
Broadly speaking there are two ways to build your product’s moat:
- Quality – Depending on the type of product, quality can be measured in several ways, such as better features, performance, reliability or aesthetics. But because quality is often hard to judge before actually using a product, a customer’s perception of quality is often based on reputation or brand which can be expensive and slow to build.
- Price – Unlike quality, price is easy for customers to assess. Therefore, low price can be a very effective way to quickly capture market share.
- Flywheels – A flywheel is any component of your product that increases the size of your moat over time as you succeed. We will discuss flywheels in greater detail below.
Flywheels
Unless you have access to valuable intellectual property or significant cost advantages for labor, materials or other inputs, competing on features or price will provide only short term advantages. This is why we encourage you to build flywheels into your strategy. Here are some examples:
- Network effects – Network effects occur when your product becomes more valuable to customers as the number of users grows. For example, Fax machines had little value until enough people owned them to make sending faxes a convenient form of communication. Then, over time, the value of each fax machine grew as they became more common.
- Platform strategy – Platforms are products that create value by facilitating exchanges between customers. Marketplaces like Ebay, Airbnb and app stores are one example. Social networks, like Facebook are another. In all cases, the product’s moat grows with the number of users and interactions.
- Data effects – With technology products, the accumulation of data over time can create extremely large moats. For example, Facebook has enormous amounts of data on each user, which is then used by advertisers to target ads. The more data Facebook obtains, the more it can charge for ads and the harder it becomes for other platforms to compete.
- Economies of scale – Economies of scale occur when it becomes cheaper to provide your product as demand grows. For example, a car manufacturer receives increasingly large volume discounts on parts as they manufacture more vehicles.
- Switching costs – Switching costs make it hard for customer to replace a competitor’s product with yours, and they typically increase over time. Products with steep learning curves, such as complex software, often have high switching costs. Switching costs are also high with products that improve over time as they gather more data about users, then utilize that data to improve the user’s experience. Examples include Netflix, Spotify and Youtube.
Points to Consider
- Flywheels can be combined – The best products combine multiple flywheels. For example, Facebook combines network effects, switching costs and platform strategy. The iPhone combines economies of scale with switching costs.
- Flywheels can take time – Its OK to start by competing on price or quality, but you should plan to build in at least one flywheel into your product in the future. Gathering feedback from customers can be enormously helpful to this process so don’t delay your launch just because you haven’t figured out your flywheel strategy.
Helpful Resources
- The Rise of The Platform Economy.
- NFX Ventures, The Network Effects Manual
- Product Manager HQ, Switching Costs
Deliverables
- Create a list of advantages that will help you stand out within the competitive landscape that you defined in the last step.
- Divide your list into advantages that can be implemented now or must be postponed until later.
- Share the list with your team for feedback.
STEP SIX: Define Your Product Vision
Now that you have a clear picture of your customer, competitors and competitive strategy, it's time to define your product vision.
The product vision brings your product’s long term goals to life in a compelling, persuasive way. A good product vision serves several important functions:
- Guides your team’s decision-making as you move through the development process.
- Enables your team and other stakeholders to align around a shared vision.
- Inspires and motivates internal and external stakeholders to help manifest the vision.
There are no rules on how to communicate your vision. One of the simplest approaches is to write a statement using the following format:
- For (target customer) who (statement of need or opportunity), the (product name) is a (product category) that (key benefit, reason to buy). Unlike (primary competitive alternative), our product (statement of primary differentiation).*
Here’s how Microsoft used this approach to communicate their vision for the Surface tablet:
- For the business user who needs to be productive in the office and on the go, the Surface is a convertible table that is easy to carry and gives you full computing productivity no matter where you are. Unlike laptops, Surface serves your on-the-go needs without having to carry an extra device
Alternatively, you can create a slide presentation, a prototype, even a video like the one Apple created for their Knowledge Navigator product. Whatever format you use, the important thing is to find an approach that is tailored for your product and audience to create maximum impact.
Points to Consider
- Choose an appropriate timeframe – A product vision that's focused too far in the future will be harder to relate to and may seem unattainable. A shorter timeframe may feel unambitious and uninspiring. For most technology products, a 3-5 year timeframe strikes the right balance.
- Be specific – The more detailed your vision, the more believable it will be and the better it will serve as a guide for strategic decision making. Don’t shy away from details like user personas, use cases and design elements.
- Be bold – Don’t be afraid to predict the future in ways that may make you uncomfortable today. As you craft your vision, try to imagine how your product will change your customers lives, your industry and even society as a whole.
Helpful Resources
- Roman Pichler, Eight Tips for Creating a Compelling Product Vision
- Microsoft, Productivity Future Vision Video
Deliverables
- Choose a format and create your product vision
- Share it with your team for feedback
Product Roadmaps
Introduction
In this course you will learn the importance of product roadmaps and how to create and use them.
What is a Product Roadmap?
A product roadmap is a visual depiction of your product’s journey from its current state to a future version. The format is essentially an XY graph that plots product attributes on the Y-axis against an X-axis representing time.
Roadmaps can be created for either external or internal consumption. The former are typically shared with customers to help them anticipate when certain features will be available. This type of roadmap is typically very specific with regards to feature breakdowns and dates. Our focus in this article is the internal kind, which are less specific, leaving teams more freedom to define features and set priorities over time.
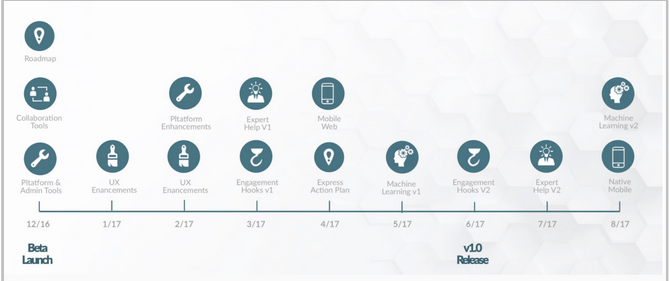
Example of high level roadmap.
Example of a detailed roadmap.
Why Create Product Roadmaps?
Product roadmaps can be an extremely valuable tool for creating shared product understanding within an organization and marshalling the necessary support from different functional groups. More specifically they serve three main functions:
- Help communicate your product strategy and vision – Product teams use a variety of tools to communicate their product vision, such as slide decks, vision statements and prototypes, but these only tell part of the story. Product roadmaps provide important context and specificity by describing the product’s evolution over time.
- Communicate priorities – The time scale or x-axis of a product roadmap is a statement about priorities. Items on the left side of the timescale are delivered sooner and are therefore higher priority than those on the right.
- Convey time-based commitments – While roadmaps should not be viewed as an agreement to specific features and dates (more on this later), they do provide the broader organization with a sense of a product team’s high-level commitments. This can help executive management provide better oversight and help sales and marketing teams plan their activities.
What Roadmaps Are Not
It’s tempting to treat roadmaps as a kind of feature list or spec, but you should avoid this. Your roadmap should be concise and big picture. It should tell a story about your key objectives, not the tactics you’ll use to achieve them. This is important for several reasons:
- Product teams are more engaged and productive when they have the freedom to define their own solutions and set their own priorities. And since the product team is typically closest to the customer, they are in the best position to make these decisions.
- Product teams shouldn’t be measured solely on their ability to deliver features. A feature must also deliver value by solving the customer’s problem and helping the company meet its business goals.
- Your current assumptions about which features are needed may be wrong. Learning is inevitable as you receive customer feedback. Your roadmap should enable you to embrace change, not resist it.
- While a roadmap depicts time, it can’t predict the future. Until your product design is complete and you have buy-in from engineering, its impossible to know precisely when you will release a given feature.
STEP ONE: Define Epics
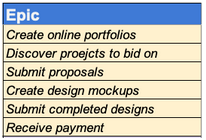
In the Product Scoping module we discussed the concepts of the product backlog, user stories and epics. A typical product backlog might contain hundreds of user stories and because the roadmap is meant to be concise, it would be impossible to display all of them. However, the typical backlog contains far fewer epics. Therefore the first step in creating your roadmap is to combine your user stories into epics.
Points to Consider
- To ensure your roadmap has enough detail while still being concise, aim for between 15-25 epics.
- For this exercise we recommend creating a spreadsheet with columns for each epic and the user stories it contains. This way you can easily sort and filter by epic.
Deliverables
A list of epics that describe your products functionality as it evolves and matures over time.
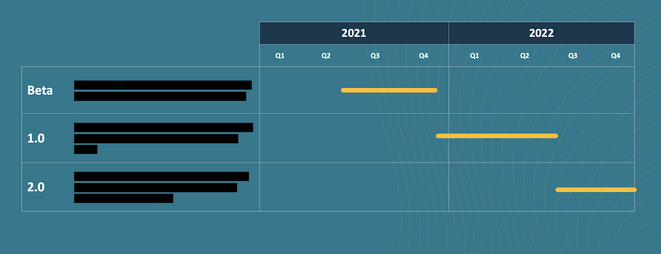
STEP TWO: Choose a Timescale
It's important to choose the right time scale, or x-axis, for your roadmap. But first you need to know that when it comes to time scales there are two types of roadmaps: specific and non-specific. Date-specific roadmaps display time increments such as weeks, months or quarters. Non-specific roadmaps display looser categories like “Now, Next, Later.”
The approach you choose depends on several factors: (1) the complexity of your product; (2) your knowledge of the technical and design problems you’ll need to solve; (3) the degree to which your organization follows agile vs. waterfall practices; (4) the demands of your customers, industry or executives for timely delivery. In general, if you are developing a complex product in an agile environment, you’re better off with a non-specific timeline, or a timeline based on a large time increment like quarters. This gives your product team the opportunity to discover the best solutions for the customer’s problems without being forced to follow an arbitrary schedule.
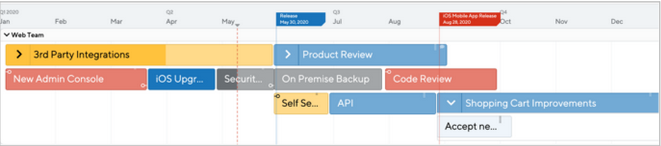
Month-by-month timescale
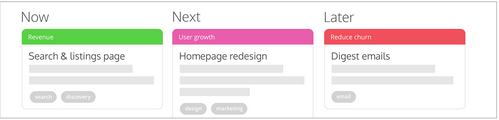
Non-specific timescale
Points to Consider
- It's tempting to provide a specific timescale in order to please customers and internal stakeholders, but unless you are highly confident in your ability to deliver on time, you should avoid doing this because your team’s credibility and morale will be affected by delays.
- Product management tools like ProductBoard and Roadmunk enable you to expand and collapse timescales. This can be a useful way to share roadmaps that cover longer periods of time.
Deliverables
A choice of time scale that fits the needs of your product and organization.
STEP Three: Create Your Roadmap
Now that you have a timescale and a set of epics, it's time to create your roadmap by arranging your epics on the timeline. At this point, you may be wondering what tools to use. Because the process of creating roadmaps is usually iterative and your roadmap will surely change over time, it's best to choose a tool that enables you to update your roadmap easily. The options fall into three basic categories:
- Presentation applications (e.g. Powerpoint, Keynote, Google Slides) – These tools provide maximum control over your layout and design, but will make your roadmap harder to update compared to the other options below.
- Spreadsheets (e.g. Excel, Google Sheets, Numbers) – Spreadsheets are easier to update than slides but provide fewer design options.
- Dedicated applications (e.g. Aha!, Roadmonk, ProdPlan) – These tools provide a balance between attractive design and ease of updating. They also typically enable you to expand and contract epics, and include features for other product management tasks, such as prioritization and gathering customer feedback. However, there are some downsides to be aware of: (1) You and your team will experience a ramp-up period while you are learning these tools; (2) They typically impose restrictions on the layout of your roadmap whereas spreadsheets and presentation tools allow for infinite flexibility.
Whichever tool you choose, the process of creating your roadmap is identical:
- Prioritize your epics based on release sequence. To do this, simply arrange them top to bottom with the highest priority epics on top. For example:
- Assign a point on your timescale for each epic. In doing so, try to be realistic about timing without going overboard. At this point you simply don’t have enough information about design and development complexity to set specific dates. Also your customer’s needs should dictate timing as much, if not more, than your development schedule. For example:
Points to Consider
- Make sure your tools and roadmap structure will allow you to easily make updates in the future.
- To further organize your roadmap, consider dividing your epics into themes. For example, going back to our car example, you could group all safety-related epics under a “Safety” theme and all performance related epics under a “Performance” theme.

- At this point you should be ready to share your roadmap with your product team and the broader organization. Ask for their feedback and if they have any questions or concerns. Ultimately, you want to make sure they understand the journey you have mapped out and are ready to support you.
Deliverables
- A completed roadmap, ready to share with your team for feedback.
Product Design
Introduction
“Design is a plan for arranging elements in such a way as best to accomplish a particular purpose.”
Charles Eames, American designer, architect, and filmmaker
If you have taken our Product Discovery and Product Strategy courses, you should have a good idea by now about what to build and for whom. Moreover, you should have an inspiring product vision with clear goals and a strategy to create a sustainable competitive advantage. If so, the next step is to design your product.
This course will teach you important design concepts that will save you time and money as you move through the design phase. Before you start, please note the following:
- This course was designed primarily with technology products in mind, but the information here can also be applied to other types of products.
- This course presents a sequence of steps that a product manager would typically follow. However, every product and team is different so we encourage you to adapt this process as needed. Feel free to choose your own sequence or even skip certain steps if you feel they don’t apply to you.
What is Product Design?
Product design has numerous definitions. While some definitions include product discovery, we will assume it starts after an initial discovery phase has been completed. Some definitions also include parts of the product that are invisible to the user, like algorithms, but for our purposes we will only include what the user can see, hear or otherwise sense. Product design also encompasses many separate areas of design. Here are some terms you may encounter:
- User interface design – Also called “UI design,” this is the practice of creating ways for users to interact with a product.
- User experience design – Also called “UX design,” this type of design attempts to optimize the user’s experience across all touchpoints, not just the product itself. These might include packaging, customer support and service.
- Visual design – The process of choosing of colors, fonts, icons and other visual details that add polish to a screen or web page.
- Interaction design – The design of animations, sounds, vibrations and other sensory cues that result from a user’s interaction with a product.
- Workflow design - The way that individual features are connected in a path, or the path through a single feature.
- Feature design – The arrangement of components that comprise a single feature.
Putting Users First
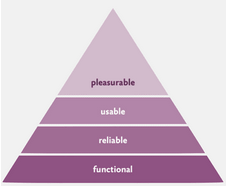
The goal of product design is to transform raw ideas into a tangible and unified whole that helps achieve your product goals. While it was not always the case, today there is universal agreement that the best way to approach this process is by putting the user first. This is sometimes referred to as user-centered design, human-centered design or design thinking. Putting users first means thinking deeply about their needs. We can visualize these as a pyramidal hierarchy starting with the most important needs at the base.
- Functional – Does your product enable the user to achieve their goals?
- Reliable – Does the product function as expected on consistent basis?
- Pleasureable – Does the product elicit positive emotions?
- Pleasureable – Does the product elicit positive emotions?
Design is Good Business
If you want your product to succeed in the market, you should care deeply about its design. During the past 20 years we have seen an explosion of design-driven products and companies and the evidence is clear: good design is good business. In fact, according to one study, design-centric companies outperformed the S&P 500 by 228%. And we can see this impact all around us in companies like Apple and Airbnb whose products weren’t first to market, but wound up dominating their markets through good design. The increasing prevalence of good design has now created an expectation in users that whatever product they choose will live up to the design standards they have become accustomed to. This means, now more than ever, your product must be well designed in order to compete.
Helpful resources
- Ineractiondesign.org, What is Interaction Design?
- Neilson Normal Group, The Definition of User Experience Design
- Ineractiondesign.org, UI Design
Design Benchmarking and Inspiration
“Good Artists Copy; Great Artists Steal”
– Unknown
Product design isn’t easy but due to the explosion of good design, you are in a fortunate position: there are now many well-designed products you can draw upon for inspiration during your design process. You can even take this approach a step further by copying existing designs. This may sound unethical, but this is a common practice that is achieved using an approach called “UI patterns.” UI Patterns are repeatable solutions to common design problems. You can find patterns for simple features such as sign up, sign in, log in and log in, but also more complex ones like recommendation engines and user dashboards. Not only will UI patterns save you time and money, but they will increase the likelihood that your product is both usable and pleasurable. This is because your customer uses many other products on a regular basis that also follow these patterns. User behavior is hard to change so if you deviate from standard patterns, you are forcing your customer to learn a new way of interacting which may result in dissatisfaction or even abandonment of your product.
Points to Consider
Product design has numerous definitions. While some definitions include product discovery, we will assume it starts after an initial discovery phase has been completed. Some definitions also include parts of the product that are invisible to the user, like algorithms, but for our purposes we will only include what the user can see, hear or otherwise sense. Product design also encompasses many separate areas of design. Here are some terms you may encounter:
- Sometimes design innovation is necessary – If you are trying to solve a design problem and there is no established pattern, you should innovate, but make sure to test your design with your target customer and iterate as needed until you have mitigated as much risk as possible.
- Look across industries – Products that solve similar problems in other industries can be an excellent source of design inspiration. This approach can also provide a significant competitive advantage by enabling you to innovate within your industry without the risk of creating a new design pattern from scratch.
Helpful Resources
- UX Collective, Design Patterns
- Erin Malone, A History of Design Patterns
- Interaction Design Foundation, 10 Great Sites for UI Design Patterns
Deliverables
- Identify the elements of your product that you believe can be based on existing designs.
- Find products that are solving similar problems.
- Determine which of these existing designs can act as a basis for your product’s design.
- Share with your team for feedback.
Platform Selection
One of the most important decisions you will make when designing your product is your choice of platforms. A platform is a special type of product: one that enables the creation or delivery of other products. The most widely used are the dominant smartphone and personal computing platforms: Apple’s, IOS, Google’s Android, and Microsoft Windows. Other major platforms include smart speakers like Amazon’s Echo, and TV-centric platforms like Roku. Looking to the future, popular platforms may one day include glasses, headsets, or even chip implants. Due to the disparate nature of these platforms, the optimal design for your product will vary significantly depending on the platform you choose. In addition, the functionality of your product may also need to vary for different platforms. Therefore technology products often have to undergo expensive modifications to work on more than one platform. This is just one reason why choosing the right platform is a crucial step in your product design process. In the next section, we will explore other factors.
Choosing a Platform
Platform selection can be complex, but if you take a strategic approach you can narrow down the choices considerably. Here are the primary factors you should consider:
- Audience – How many of your target customers does the platform provide access to? For products with universal appeal, it may make sense to choose one of the dominant platforms. For special purpose products, the choice of platform should be driven by the access they provide to your target customer.
- Time to market – As discussed, early identification of risks is crucial to product success. Therefore, as you choose a platform you should consider the amount of time it will take to bring your product to market. For example, since mobile app development takes much longer than website development, it is common for products to launch first on the web.
- Cost - How much does it cost to develop or operate your product? Development costs include designers, engineers and testers. Operating costs include app store fees and software licenses.
- User experience – Will your chosen platform enable you to create a functional, reliable, usable and pleasurable product? Also consider the ease of access to your product that each platform offers. For example, a website is relatively easy to access – simply click a lick, perform a search or type an address. Now compare this to installing a mobile phone app: the user must launch the app store, find the app and often enter a password or credit card before they can finally download it.
- Ease of proliferation – How much opportunity does the platform offer for your product to spread? For example, users can easily find smartphone apps through app store and internet searches. App stores also provide algorithmic recommendations. By contrast, it is much harder for users to discover new applications on smart speaker devices. Also consider the opportunity for your product to spread virally within or across platforms. Using our previous example, it’s relatively easy for users to share smartphone apps and websites but much harder to share smart speaker applications.
Points to Consider
- Prioritize your platforms – It is rare to launch a new product on multiple platforms. Even large companies will usually release a new product on a single platform to gauge customer response and obtain feedback. Therefore, you should try to limit your first release to one platform and use the feedback you receive to plan your next one.
- Consider emerging platforms – Sometimes it pays develop your product for newer platforms that may not be widely used now, but are growing in popularity. You will face less competition and as the platform grows you will have the opportunity to build a strong reputation and platform expertise.
Helpful Resources
- MIT Sloan Management Review,The Future of Platforms
- Statcounter, MobileOS Market Share
- Paul Shustak, Mobile Second: When To Target Desktop Users First
Deliverables
- Review the selection factors above
- List the top five platforms for your product in priority order
- Share with your team for feedback
- Choose one platform for your product launch
Product Scoping
Product scoping is the process of deciding what to include and exclude from your product. Scoping is especially important when launching a new product because time and money are at a premium. Proper scoping enables you to reach your product goals as quickly and efficiently as possible.
Waterfall vs. Agile
Until the mid 2000’s product scoping usually involved creating a prioritized list of features. The team would then estimate the cost of developing each feature and how far down the list they could afford to develop given their available time and resources. This was known as the waterfall approach because the entire product scope would be sent to engineering, and then to testing in a waterfall-like fashion before a final release could occur many months later.
Since then, a methodology called agile that uses an iterative approach to scoping has become dominant. Instead of planning the entire scope in advance, development is performed in short bursts called sprints. Working software is released after each sprint and the scope is subject to change as the team receives feedback on each release.

User Stories and Epics
Another impact of agile is that feature specifications have been largely replaced by user stories. User stories are one sentence scenarios that describe the problem that a feature is supposed to solve and for whom. For example, suppose you are designing a braking system for a car and your target customers live in snowy areas. Your user story might go something like this: “As a driver I need the ability to stop my car quickly in the snow in order to avoid accidents.”
Stories are often combined together into larger groups called epics. Going back to our car example, suppose we need to ensure the car can brake safely under other adverse conditions such as rain, sleet and unpaved roads. We could then create user stories for each of these conditions and group them into an epic called “Safe Braking.”
The Product Backlog
Another key agile concept is the product backlog. This is simply a prioritized list of user stories with the most important stories at the top. With each development cycle, stories are handed off to the development team for execution. When feedback is received, the backlog is re-prioritized or “groomed.” There are many prioritization techniques you can use. Some of the most popular are MOSCOW, RICE and story mapping.
Using an agile approach, it's obviously impossible to predict what your backlog will look like from sprint to sprint because the process is iterative. However, you should prioritize your backlog as best you can in alignment with your product goals and vision. Even though it may change over time, this will give your team a firm baseline to work from. Remember, the first version of your product won’t include every user story, so as you build your backlog limit your focus to the first few iterations of your product.
Helpful Resources
- Attlassian, The Agile Guide
- Mike Cohn, User Stories
- Folding Burritos, Product Prioritization Techniques
Deliverables
- Create a product backlog by writing all the user stories that you think are needed for the first version of your product.
- Prioritize your backlog based on one of the prioritization techniques mentioned above
- Discuss the results your team
Measurement
“If you can’t measure it, you can’t improve it.”
-Peter Drucker
Measurement may not seem related to design but gathering the right data from users is crucial to improving your design after it launches. And knowing in advance what to measure not only improves your ability to capture the right data, but can also result in a more effective design. This is because framing your product goals in numerical terms forces you to think about the user behaviors you want to encourage and how the different parts of the user experience contribute to them.
Let’s take an example. Suppose you are designing a social media app and the behavior that you want to encourage is getting users to post frequent updates. In that case, your design might include sending weekly reminders to users who haven’t posted in awhile, and a large, colorful “post” button to attract their attention.
Once you have identified your desired user behaviors, the next step is to determine how you will measure them and set targets, as follows:
- Define KPIs – KPI stands for “Key Performance indicator.” These are the metrics that your product design should optimize. For example, with our social media app we would certainly want to include a KPI that enables us to measure our success in getting users to post frequently. One such KPI might be the number of posts per user per month. Another might be the percent of users who click on the weekly reminders.
- Set Targets – Once we know what to measure, setting targets for these measurements helps us further optimize our design. For example, suppose we set an ambitious target for our monthly posts KPI. That might lead us toward further optimizations such as animating the button and increasing the frequency of the reminders.
Conversion Funnels
Conversion funnels are an important concept when it comes to measurement and optimization. A conversion funnel is the path through your product that a user takes toward some desired outcome. They’re called funnels because the flow of users is almost always funnel-shaped: the largest number of users are at the top and the funnel narrows towards the bottom as usage drops off. When thinking of your design as a funnel, your goal is to remove steps and other sources of friction in order to retain as many users as possible as they move through the funnel.
Points to Consider
- Use KPIs sparingly - Having too many KPIs makes it harder for your team to track, communicate and internalize them. You should aim for between five and ten KPIs.
- KPIs are subject to change – As you learn more about your customer, your market and your product, it's likely that one or more of your original KPIs will become outdated and will need to be replaced. Therefore, don’t worry too much about finding the perfect KPIs and don’t cling too tightly to KPIs that aren’t serving the needs of your product.
Helpful Resources
- Alexsoft, 15 Key Product Management Metrics and KPIs
- SMB Advisors, The Four Significant Funnel Metrics You Should be Following
- Daily Egg, How to Create a Website Conversion Funnel
Deliverables
- Compile a list of ten metrics that are crucial for your product to measure.
- Choose your top five from this list. These are your KPIs.
- Set targets for each KPI.
- Review your product design to ensure it is optimized to meet your targets.